25 February 2014

Day 27 - Carbon Stone Guards & Gearbox Oil (4 Hours)

Dale joined me for a couple of hours, or that was the plan! Thanks Dale. :-)

Job 86 - Carbon Stone Guards

Following the removal of the rear wings yesterday, it seemed appropriate to position and fit the Carbon Stone Guards on the rear wings. With 2 of us working on them it was an quick and easy job.

Carbon Stone Guards lined up ready for riveting
 Job 87 - Gearbox Oil

Oh my lord! What a painful job this was! We started by trying to manoeuvre a pipe supplied by fellow builder Andrew Bissell, but being an S3 it is very tight between the gearbox and transmission tunnel I couldn't get the pipe to sit securely in enough, more oil ended up in the catch tray than the gearbox!

Next course of action was to find some thiner pipe, we ended up using some left over washer pipe! It was somewhat thinner and as a result it was easier to insert, the flip side being that it took us just over 3 hours to put 1.3 litres of gearbox oil in the gearbox! Plenty of time to chat and catch up!

Filling the gearbox using pipe and a tiny funnel!
Pipe running along side the transmission tunnel into the gearbox
Once the oil started dribbling out of the gearbox it was time to get the plug in! A messy job it had to be said, but the plug & allen key solution worked a treat. I used a 10mm spanner to turn the allen key and hence do up the plug a quarter of a turn at a time.

It took a bit of time to get the plug correctly aligned so that it would bite in the tread of the gearbox. I would recommend marking up the plug with a paint pen in the location where it bites before putting the oil in the gearbox.

My recommendation to others, fill the gearbox before it goes in the car! I hope these tips help someone else!

23 February 2014

Day 26 - RHS Side Repeater, Rear Arch Removal & Radius Arm Reattachment (1 Hour)

After a night out on the tiles last night I really wasn't up for doing much at all today! Never again! :-)

Alex gave me a lift home having stayed at his and we tackled a couple of quick jobs.

Job 84 - RHS Side Repeater

Following the arrival of some more heat shrink we completed the wire routing for the RHS Headlight & Side Repeater
RHS lighting routed inside the car
Job 85 - Rear Arch Removal & Radius Arm Reattachment

We removed the rear wings as the carbon stone protectors need to be fitted also allowing us access to refit the Radius Arms which was definitely a 2 person job.

Radius Arm Reattached

22 February 2014

Day 25 - Detailing, Gearbox Pug, Harness & Tunnel Panel (1 Day)

Today was set aside for Ben to come and undertake some detailing on the paint work. Ben wanted to get started early and arrived at 8.15 and left at 17:30 so a long day. The car looks great, Thanks Ben.

Job 80 - Detailing
Compound used to take some of the lacquer off
Compound takes all the shine out of the paint work 
Some of the lacquer being taken off  
The wheel arch is some what dulled by the application of compound
Ben hard at work and Alex with his head in the wheel arch!
Polish applied before using the polish 

From the back in fading light! Thank goodness for the mobile Axle Stands, although I should have unlocked one of the front castors! :-) 
From the Front
From the side
Job 81 - Gearbox Plug

Having read a few posts about filling the gearbox there are 3 trains of thought!

  1. Fill it before putting it in the car - The easiest, but no mention of this in the build manual and too late now!
  2. Cut an L-shaped Allen Key so that it has a shorter 15mm straight before the bend
  3. Cut 15mm length off an Allen Key and Araldite it into the plug.
I took the 3rd option and used the trusty Dremel to cut an Allen Key I purchased for the job.

Sparks flying
Not sure how Katey managed to get this with my phone, but looks good. :-)
Gearbox Plug and Allen Key section pressed in the vice whilst the Araldite set

Job 82 - Harnesses - Test Fit

Whilst Ben was detailing the car I looked for a couple of other jobs to do where I wouldn't be in the way. I decided to focus inside the car and looked to loosely fit the harnesses as they would need to be taken off to do the boot cover later.

4 point harnesses in place
Job 83 - Transmission Tunnel Plate

The second job was to fix the transmission tunnel plate in place with rivets. I had to get the Dremel out to open up some of the holes a little so that I could put a rivet in each hole.

Rivets in place ready to be pop riveted
Last Rivet :-)

16 February 2014

Day 24 - Lower Floor Sealing, LHS Side Repeater, Hoodstick Preparation & Sill Protectors (6 hours)

I spent some time trying to think of jobs that wouldn't affect access for Ben when he comes round on the weekend to undertake the detailing. Alex joined me to assist with some of the build.

Job 76 - Lowered Floor Sealing

Having let the ACF50 in the side panels and the transmission tunnel settle we cleaned up any residue that had worked its way out and I looked to add additional sealant to around the lowered floors. I used Tigerseal to do the having used it before on the tin top.
Make Sure you use gloves with Tigerseal - It's very sticky indeed!
Job 77 - Side Repeater Preparation

First job of the day was to remove the front cycle wings from the Wing Stays to access how best to wire up the LED side repeaters. I purchased some bullet connectors during the week with the aim of creating a system that could be disconnected quickly and easily.

Bullet Connectors - Top 2 are the Originals, Bottom 2 are with Plastic removed
We decided to start at the at the cycle wing end of things and solder the male end of the Bullet Connectors on to the LED wiring. The gas powered Soldering Iron came in very hand as there are no wires to worry about like the last Soldering Iron I used!

Warming up the Soldering Iron
Once the Bullet Connectors had been attached to the Side Repeaters it was time to look at the wiring in to the body.

As the standard Indicators had a long enough cable with the socket to attached to the end of it. We decided to cut the lead and utilise that, as I was not screwing the cycle wing to the stay we decided to feed the Earth wire through to the body along with the Positive. We figured out that it would be best to feed a wire up from the bottom of the wing stay to attach the Positive and Earth to and then pull back through.
Side Repeater Positive & Earth Leads fed through the Wings Stay to measure for length
Once the wires had been cut to length we located suitable earth point inside the car, the cables were removed from the Wing Stay and shrink wrapped before feeding back through the Wing Stay to the top of the Wishbone inside the body. We attached a Ring Connector to the Earth cable and attached this to the Earth on the brake pipe linkage where another Earth was connected.

Soldering the Female Bullet Connector to the Wing Stay Wires
Once the all the Bullet Connectors were soldered we connected the wires up and tested the Indicators again. Nothing from the Side Repeaters, so we changed the connectors around and phew, they worked although faster than normal! Wondering if this was down to the fact they were LED's or that the rear Indicators were missing we connected the rears temporarily, this slowed the flash rate down, RESULT. :-)

We then tried the other lights and nothing from the side or dipped lights! I will have to check the fuses, but as expected there is no indication as to which fuse is for what! A call to Caterham I think to try and get some information about it (for future reference mainly).

Due to a lack of enough heat shrink we left the RHS to do another day.

Job 78 - Hoodstick Preparation

I had looked to fit the Hoodstick as I didn't think it would get in the way of the Detailing, but I was wrong so we just prepared this off the car ready for fitting afterwards.

Adding the hood straps
Job 79 - Sill Protector Preparation

Again these couldn't be fitted at this stage, but they could be prepared.

Fitting the Carbon Sill Protectors in between the body and skin
Tipex pen used to mark the rivet hole locations
Tipex'd hole marks just before drilling

15 February 2014

Day 23 - Propshaft Bolts & ACF50 (3 Hours)

Job 74 - Propshaft Bolt Refitting

Further to reading a couple of other blogs and some posts on Blatchat I realised that I had Copper Greased the Propshaft / LSD bolts rather than using loctite!

This meant removing the bolts and all the Copper Grease via a combination of Toothbrush and Cotton Wool Buds! This took an age! :-(

Once I had removed all the Copper Grease I applied loctite to the threads and re-fitted the bolts torquing them up to the required value.

Job 75 - Transmission Tunnel ACF50 Application

I decided to coat the Transmission Tunnel with ACF50 so as to protect as much as possible before the tunnel cover goes on.

12 February 2014

Day 22 - Detailing Discussion & Rear Wing Fitment

Following a slight miss understanding between Ben and I we didn't end up detailing the car this evening.

Job 72 - Detailing Discussion

Ben came around after we had both finished work to have a look at the car and discuss our plan moving forward.

Ben was pleased to see how the car had progressed and to see what work would be required to finalise the paint job. We had a look around the car and had a chat over a brew about the build to date and how I had found it. We have set a date in a couple of weeks time where we will spend a bit more time on the car.

Job 73 - Rear Wing Fitment

I had looked at doing this over the weekend and ended up deciding that it was a 2 person job. Dale was free this evening so we worked on cutting the rubber that fits between the Wing and the Body. We used the garage heater to warm up the rubber before laying it out over the wheel arch and whilst I held the rubber in place Dale cut out the notches to provide a smooth curve around the wing as well as holes for where the fixing bolts go through. Once we had completed one side we offered it up to the car and loosely attached the wing, allowing us to slide the Rubber Trim in from the top to confirm fitment. Slight adjustments were made and the wings were then removed and put back in the dinning room for the time being.
Cutting around the Holes & V Notches in the Rubber Trim
Wing loosely attached
Rubber Trim fitted around the Rear Wing

10 February 2014

Day 21 - Detailing Preparation (1 hour)

Ben is due around this week to detail the car, so in order to be able to undertake the work, I decided to fit the nose cone and bonnet so that it was ready and gave a firm base to detail on.

Before fitting the front end
Job 71 - Fitting the Nose Cone & Bonnet

Fitting the nose cone was a bit of a challenge first time around. The fixings didn't seem to marry up, but having read other posts it was a case of brute force to fit!
Nose Cone fitted - Not the Directional Headlight, my version of Cornering lights! :-)
Temporary insulation tape in place - Protective Foam was removed for painting
- Replacement in the post form Caterham.
Painted 7 on the grill :-)
Nose Cone and Bonnet loosely in place - No fixings on the bonnet yet, making it easier to detail
A momentous occasion getting a idea of what it will really look like! :-)

8 February 2014

Day 20 - Fuel Pipe Cover, Track Day Roll Bar & Rear Shocks (5 Hours)

I am working to get the car ready for Ben to pop around and do some detailing on the car. As a result I haven't fitted the exhaust, which means I can't fit the steering column and steering wheel, so what else can I prepare?

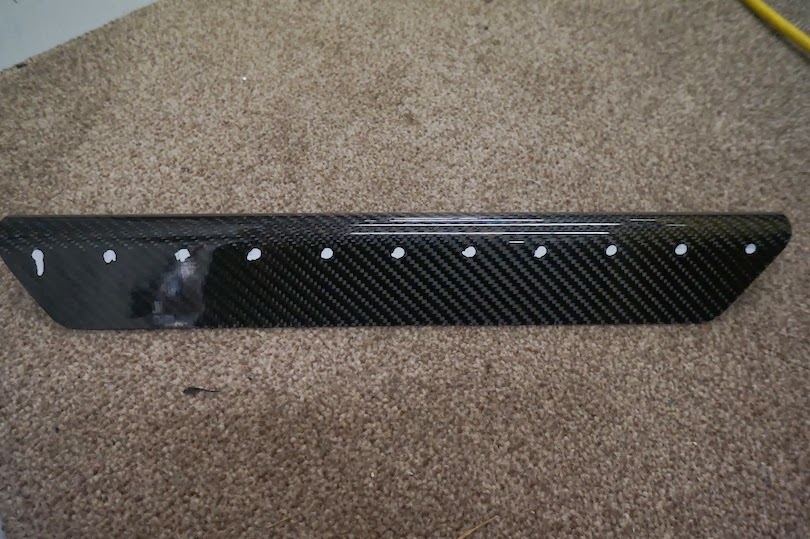
Job 67 - Fuel Pipe Cover

Although not ready to go in yet, I decided to prepare this by drilling the 2 2mm holes that are required to mount the Fuel Pipe Cover as it is easier to do this before the Roll Bar and Boot Floor are fixed in place.
Fuel Cover Drill holes - Awkward to get to when everything is in place
Job 68 - Fit the Track Day Roll Bar

In order to fit the Rear Shocks the Track Day Roll Bar needs to be fitted first. The standard Roll Bar uses 4 mounting bolts, the Track Day uses 6 mounting bolts, of which 2 bolt up from just above the Rear Shock Top Mounts, which a re not accessible once the shocks are fitted!

Track Day Roll Bar Mount from underneath - Just above the Top Shock Mount that runs perpendicular to it.
Bolt fixing that is used on both Standard and Track Day Roll Bar
Track Day Roll Bar Fitted
Job 69 - Fit Rear Shock Absorbers

In order to be able to put the car down on the ground for Ben to detail, it would be necessary to fit all four wheels and hence the only thing missing that would prevent this was to fit the rear shocks. A fairly easy job in theory!

The top bolts into the shock are easy and bolt in through the cabin area of the car out towards the boot.

Rear Top Mount for the Shock
The lower mount wasn't quite so easy! The issue is that the bolts through the bottom of the shock are horizontal and the location they screw into on the De Dion tube are at a 20 degrees out of horizontal. I tried following the instructions in the manual on my own and had no success, I tried all sorts including using the jack to lift the back end, undoing the A frame, it still wouldn't budge! After 2.5 hours I gave up frustrated! A 2 person job then! Thanks Katey.

I ended up posting on Blatchat to see if anyone could suggest something I hadn't tried! A response came back within half an hour! You have to love the power of forums!

Katey assisted me with the suggestion and even then it was a struggle! First port of call was to remove the Radius Arm front Bolt, which would allow the De Dion to rotate more. I ended up removing the Radius Arm for the time being as it would also give Ben free access to the whole of the back side of the car!

With a jack under the LHS disc, lifting the De Dion Katey laid under the car with a socket and the bolt and I tried to twist the De Dion and we managed to get it lined up, but Katey couldn't get the bolt to grip inside the De Dion. So we swapped over and managed to bolt up the LHS. With the LHS aligned and fitted, the RHS was much easier to do.

Jack under the RHS disc and Radius Arm removed
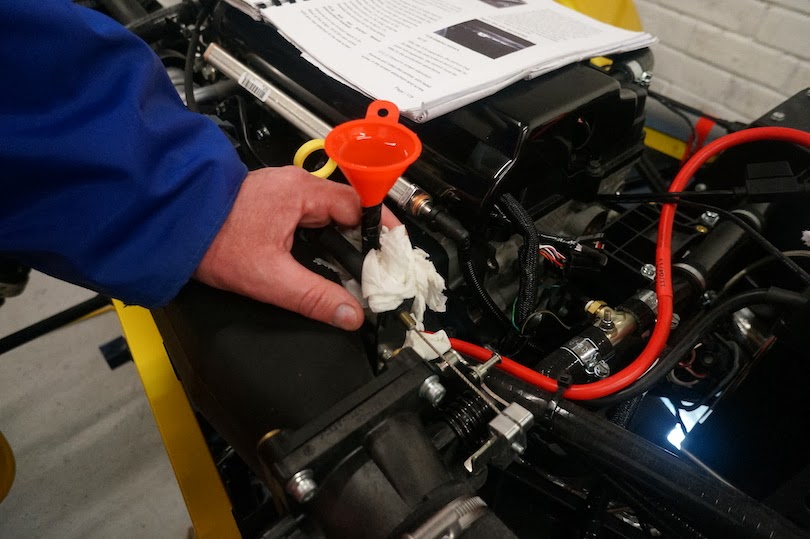
Job 70 - ACF50 Application

Last job of the day was to spray the rear end of the car with ACF50 to protect the car against corrosion. I choose to do this now as I had the boot floor out and could leave it to soak over the next few days. Have a look at the ACF50 site for more information about the product, its ideal for the Caterham as it was designed for use on Aluminium Aircraft.

Brake Discs and Pads covered to protect from ACF50 - It acts as a lubricant, not great on brakes! 
Fuel Tank & Pump sat underneath the boot floor - Also Coated with ACF50
Fuel Filler Pipe

Easy access to the top of the LSD & De Dion - Ideal time to apply corrosion protection

The Aluminium boot floor held to the Roll Bar whilst coating with ACF50